Don't you love this graphic?
It is one of the new magazine advertisements for Stampin Up!
Super Fun and I just love the fonts and colors!
Kate's Stampin Up page
Monday, August 20, 2012
Tuesday, August 14, 2012
Tissue Holder using Designer Fabric
Here's a simple project to make - and you only have to be able to sew a straight line!
I started with coordinating fabrics from Stampin' Up! and cut a couple squares and rectangles, pinned them together and did a quick sew-around, flipped the whole project right side out and voila! A little fabric pouch that you can fit a pack of tissue in. Perfect for your purse, backpack or glove box in the car!
Supplies:
One package of Stampin' Up! Designer Fabric - it comes with 3 distinct, but coordinating fabrics (I used Floral District #126893)
Coordinating thread (I used white - super simple)
Tissue pack
Cardboard and/or quilt batting to make your pattern
Pattern Instructions:
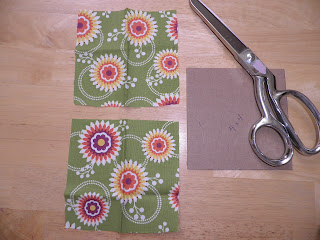
Make pattern pieces from cardboard/card stock/quilt batting -- a 4"x4" square and a 4"x5 3/4" rectangle
Cut Two 4" squares from one of the fabric prints (I probably should have ironed these....but once you sew, it doesn't really matter)
Cut Three 4"x5 3/4" rectangles from the fabrics
Construction:
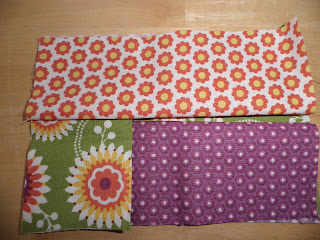
Fold both 4"x4" squares and two of the rectangle prints in half and lay the final rectangle right side UP (this will be the back of the holder)
Keeping the folded edges towards the center (nice finished edge!!), lay the folded pieces on top of the backing as pictures. You'll have to tuck the last one under the first one (see how I lifted #1 up, so the last piece could tuck under?)
---Here I laid down the purple folded rectangle, then the green folded square
---Then I laid down the white daisy folded rectangle
-----and finally the last green folded square - but I lifted the purple, so the green would overlap.
Next, pin all the pieces in place (almost done.....)
Sew around the edges (1/4" seam allowance) with a straight stitch and then give it another round of sewing using a zig zag stitch
Turn the whole shebang inside out (right side out) and insert your handy tissue pack. You might need to use your bone folder to poke out the corners.
Embellish or decorate if you'd like, and if the creases in the fabric still bother you, run a quick iron over it - but hey, it is for my purse.... it is going to get creased in there!!
Interested in learning more about Stampin' Up! or the fun fabrics and paper arts items they have available? Check out the link to my store kateamberg.stampinup.net
Thursday, August 9, 2012
August? Really? It is August??
I know, I know, there isn't much excuse for me dropping off the face of the earth in the middle of my picture of the day challenge back in JUNE!! Yikes. My bad.
Let's just say that little bits of life got in the way, but I feel like I'm back on track.
And hey - no scorpions have been sited at the house - so that is a good thing!!!
I have been very busy in the craft room - so here is a card I made today that I am sharing with the world-o-blogs.
It is made with Stampin Up stuff - interested in learning more about Stampin Up? leave me a comment or visit my Demonstrator Web Site at the main Stampin Up site (Kate's Stampin Up Site). There are all sorts of goodies to keep you busy!!
Subscribe to:
Posts (Atom)


