Here's a simple project to make - and you only have to be able to sew a straight line!
I started with coordinating fabrics from Stampin' Up! and cut a couple squares and rectangles, pinned them together and did a quick sew-around, flipped the whole project right side out and voila! A little fabric pouch that you can fit a pack of tissue in. Perfect for your purse, backpack or glove box in the car!
Supplies:
One package of Stampin' Up! Designer Fabric - it comes with 3 distinct, but coordinating fabrics (I used Floral District #126893)
Coordinating thread (I used white - super simple)
Tissue pack
Cardboard and/or quilt batting to make your pattern
Pattern Instructions:
Make pattern pieces from cardboard/card stock/quilt batting -- a 4"x4" square and a 4"x5 3/4" rectangle
Cut Two 4" squares from one of the fabric prints (I probably should have ironed these....but once you sew, it doesn't really matter)
Cut Three 4"x5 3/4" rectangles from the fabrics
Construction:
Fold both 4"x4" squares and two of the rectangle prints in half and lay the final rectangle right side UP (this will be the back of the holder)
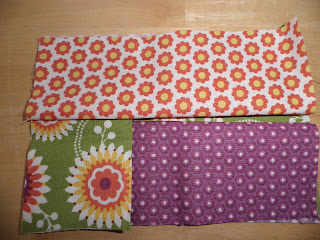
Keeping the folded edges towards the center (nice finished edge!!), lay the folded pieces on top of the backing as pictures. You'll have to tuck the last one under the first one (see how I lifted #1 up, so the last piece could tuck under?)
---Here I laid down the purple folded rectangle, then the green folded square
---Then I laid down the white daisy folded rectangle
-----and finally the last green folded square - but I lifted the purple, so the green would overlap.
Next, pin all the pieces in place (almost done.....)
Sew around the edges (1/4" seam allowance) with a straight stitch and then give it another round of sewing using a zig zag stitch
Turn the whole shebang inside out (right side out) and insert your handy tissue pack. You might need to use your bone folder to poke out the corners.
Embellish or decorate if you'd like, and if the creases in the fabric still bother you, run a quick iron over it - but hey, it is for my purse.... it is going to get creased in there!!
Interested in learning more about Stampin' Up! or the fun fabrics and paper arts items they have available? Check out the link to my store kateamberg.stampinup.net


Oh, that's so cute! I could use a little bag like that for my golf bag ;) !!
ReplyDeleteThanks Mary! And....good to know that you could use one!!
ReplyDeleteCute tissue holder and terrific tutorial! I'm now following your blog from SC and hope you'll follow mine at http://goinovertheedge.blogspot.com.
ReplyDeleteHugs,
Terry
Thanks Terry! Yes, I'm headed for your blog now!! Thanks for looking!!
DeleteI love the bag Kate! Thanks for sharing at Snips and Spice Sunday Slice. I featured you this week!
ReplyDeletehttp://snips-and-spice.blogspot.com/2012/08/saturday-is-special-day-party-features-7.html
thanks Malory! Love your Sunday Slices!!
ReplyDeleteThis is really cute! This would be a great way for my girls to carry tissues in their backpacks.
ReplyDeleteThanks for visiting Shirley Ann! Glad you liked the tissue packet.
ReplyDelete